Circuit Breaker Pattern

Software system 이 네트워크상 서로 다른 소프트웨어를 원격으로 호출하는 것은 매우 일반적이다.
특히 Cloud 환경에서 MSA 로 서비스를 구현하는 경우라면 더욱 그렇다.
메모리 내 호출과 원격 호출의 가장 큰 차이점 중 하나는
원격 호출이 실패하거나 일부 제한 시간에 도달할 때까지 응답 없이 중단될 수 있다는 것이다.
요청이 많은데 응답하지 않는 서비스가 발생할 경우 중요한 리소스가 부족하게 되어
여러 서비스에 오류가 전파되어 전체 시스템에 문제가 발생하는 상황이 발생할 수 있다.
case 1

User Service 가 약간 지연될 때 요청이 별로 없다면 하나의 Thread 만 blocking 되어 문제가 크지 않을 수 있지만 요청이 많아질 경우 서비스에 더 많은 Thread 가 할당되고 User Service 호출을 위한 Thread 가 더 많이 할당되며 모든 Thread 가 Wait 된다.
이럴 경우 모든 Thread 가 점유되면서 다른 요청을 처리할 수 없게 되고 모든 신규 요청들은 대기하게 된다.
case 2

Module's information Service 의 응답이 느리거나 장애가 발생할 경우 해당 서비스를 호출하는 Policy Service 또한 blocking 되어 기다리게 되며 이를 호출한 Log Service, User Service... 에게 응답 지연은 전파되며 각 서비스들은 모두 case 1 과 같은 문제를 갖게 된다.
User 입장에서 응답을 오래 기다려야 하는 것은 좋은 UX (사용자 경험) 가 아니다.
User 를 오래 기다리게 하는 것 보다 실패 하더라도 빠르게 대응 하는 것이 좋다.
성공인지 실패인지 중요하지 않다. 중요한 것은 User 가 기다리지 않는다는 것이다.
Hystrix
hystrix 는 MSA 의 Circuit Breaker 역할을 하는 netflix 의 open source 이다.
문제가 발생하는 microservice 의 traffic을 차단해 전체 서비스가 느려지거나 중단 되는 것을 미리 방지하기 위해 사용한다.

hystrix 를 이용해 간단히 구현해 보자.
@RestController @Slf4j
public class TestController {
    Random rand = new Random();

    @GetMapping("/product/{productId}")
    public ResponseEntity<String> getProductPrice(@PathVariable String productId) {
        log.info("Received request ");
        if (rand.nextBoolean()) {
            throw new RuntimeException("test exception in other service");
        }
        return ResponseEntity.ok(productId + "'s price is "+rand.nextInt());
    }
}
위 서비스는 http://localhost:8080/product/123 호출 시 랜덤하게 실패를 발생시킨다.
이제 이러한 외부 서비스를 호출하는 client 를 구현해 본다.
maven 에 dependency 를 추가 하고
<dependency>
    <groupId>org.springframework.cloud</groupId>
    <artifactId>spring-cloud-starter-netflix-hystrix</artifactId>
    <version>2.2.10.RELEASE</version>
</dependency>
Main class 에 @EnableHystrix 를 추가 해 준다.
@SpringBootApplication @EnableHystrix
public class HystrixClientTest2Application {
    public static void main(String[] args) {
        SpringApplication.run(HystrixClientTest2Application.class, args);
    }
    @Bean
    public RestTemplate getRestTemplate(){
        return new RestTemplate();
    }
}
test 용 controller 를 하나 만든다.
@RestController @RequiredArgsConstructor @Slf4j
public class TestController {
    private final TestService service;

    @GetMapping("/product/{productId}")
    public String test(@PathVariable String productId) {
        return service.getProductPrice(productId);
    }
}
외부 api 를 호출할 서비스를 하나 만든다.
@Service @RequiredArgsConstructor @Slf4j
public class TestService {
    final RestTemplate rest;

    @HystrixCommand(
        commandKey = "getPriceKey",
        fallbackMethod = "defaultProductPrice",
        commandProperties = {
                // 해당 시간 동안 메서드가 끝나지 않으면 circuit open
                @HystrixProperty(name = "execution.isolation.thread.timeoutInMilliseconds", value = "2000"),
                // 성공/실패 통계 집계 시간 (default 10s)
                @HystrixProperty(name = "metrics.rollingStats.timeInMilliseconds", value = "5000"),
                // circuit open 여부를 판단할 최소 요청 수 (default 20)
                @HystrixProperty(name = "circuitBreaker.requestVolumeThreshold", value = "2"),
                // circuit open 여부를 판단할 실패률  (default 50%)
                @HystrixProperty(name = "circuitBreaker.errorThresholdPercentage", value = "50"),
                // circuit open 지속 시간 (default 5s)
                @HystrixProperty(name = "circuitBreaker.sleepWindowInMilliseconds", value = "5000")
        }
    )
    public String getProductPrice(String productId) {
        return rest.getForObject("http://localhost:8080/product/"+productId, String.class);
    }
    public String defaultProductPrice(String productId, Throwable t) {
        log.error("default fallback method error ==> {}", t.getMessage());
        return "product ("+productId+")'s price is zero";
    }
}
위 서비스에 @HystrixCommand 를 이용해 fallback method (실패 시 호출할 메서드) 를 설정해 주고
- fallback method 는 hystrixcommand 를 적용하는 method 와 매개변수까지 동일하게 맞춰준다.
필요한 option 을 설정한다.
- commandProperties 를 통해 각 method 별로 설정을 다르게 할 수 있으며
- application.yaml 을 통해 전체적으로 동일하게 설정하거나 groupKey 별로 다르게 설정도 가능하다.
- commandKey 는 작성하지 않아도 되지만 (기본적으로 unique 하게 생성) 설정해 주는 것을 권장한다.
위 설정을 해석해 보면 아래와 같다.
- 이 메서드가 2초 이상 걸리면 circuit open
- 5초 동안 메서드의 성공/실패를 집계하며 최소 2번의 요청은 있어야 하며
- 2번 이상 요청이 오는데 1번 이상 (50%) 실패할 경우 5초간 fallback method 를 수행한다
테스트 해 보면 circuit open 조건에 다다르면 circuit 이 open 되고 open 되면 외부 서비스를 호출하지 않고
준비된 fallback method 를 호출하는 것을 확인할 수 있다.

Hystrix 주의 사항
spring boot version 에 따라 hystrix 가 정상 동작 하지 않는 경우가 있다. ??
- 같은 소스코드를 spring boot 3.1.0, 3.0.7 에서 돌려보면 오류가 발생하지 않고 fallback method 가 call 되지 않는 현상이 있다. (3.1.0 의 경우 적당한 cloud 버전이 없고, 3.0.7 의 경우 cloud version 을 2022.0.x 로 맞췄으나 동작 안함)
- spring boot version 을 2.7.x 로 내리고 그에 맞게 cloud version 도 2021.0.3 으로 조정했더니 잘 동작한다...
AOP
- @HistrixCommand 가 설정된 method 가 호출 되면 이 요청을 intercept 해서 별도의 hystrix thread 에서 처리하기 때문에 당연히 내부 class 호출은 동작하지 않는다. 물론 _self.call.. 등 여러 방법이 있긴 하지만 개인적으로 추천하지 않으며 AOP 개념을 잘 알고 있다면 당연히 내부 호출은 동작하지 않으리라는 것을 이해할 것이다.
Hystrix Dashboard
hystrix 는 circuit 을 open/close 하기 위해 monitoring 하고 있으며 이러한 집계 정보를 dashboard 를 통해 쉽게 확인 할 수 있는 Hystrix Dashboard 를 제공한다.
dashboard 에서 hystrix 의 상태 정보를 잘 취득하기 위해서
위에서 만든 hystrix test 용 project 에 actuator 를 추가 해야 한다.
<dependency>
    <groupId>org.springframework.boot</groupId>
    <artifactId>spring-boot-starter-actuator</artifactId>
</dependency>
참고) Spring Actuator
- application 을 모니터링 하고 관리하는 기능을 Spring Boot 에서 자체적으로 제공해 주는 녀석으로 http 와 jmx 를 통해 확인할 수 있다. 보통 actuator 의 health 만 open 해서 healthcheck 용으로 사용하며 dev 환경에서는 다양한 기능을 통해 상태 체크, 퍼포먼스 체크 시 사용할 수 있는데 prod 환경에서는 제한적으로 사용하는것을 권장한다. (너무 많은 정보 노출 시 위험성 때문에)
그리고 application.yaml 에도 dashboard application 에서 모두 가져갈 수 있도록 설정해 준다.
server:
  port: 8081
management:
  endpoints:
    web:
      exposure:
        include: "*"
이제 dashboard 용 spring boot application 을 하나 만들자.
dashboard dependency 를 하나 추가해 주고
<dependency>
    <groupId>org.springframework.cloud</groupId>
    <artifactId>spring-cloud-netflix-hystrix-dashboard</artifactId>
    <version>2.2.10.RELEASE</version>
</dependency>
main class 에 @EnableHystrixDashboard 하나 추가해 주면 끝이다.
@SpringBootApplication @EnableHystrixDashboard
public class HystrixDashboardTestApplication {
    public static void main(String[] args) {
        SpringApplication.run(HystrixDashboardTestApplication.class, args);
    }
}
application 을 run 하고 browser 에서 localhost:port/hystrix 해 보면 귀여운 고슴도치 녀석이 나온다.

대시보드 주소 입력 부분에 target hystrix 정보를 입력(ex. http://localhost:8081/actuator/hystrix.stream)하고
Monitor Stream 을 입력하면 circuit 이 open/close 되는 것을 볼 수 있다.
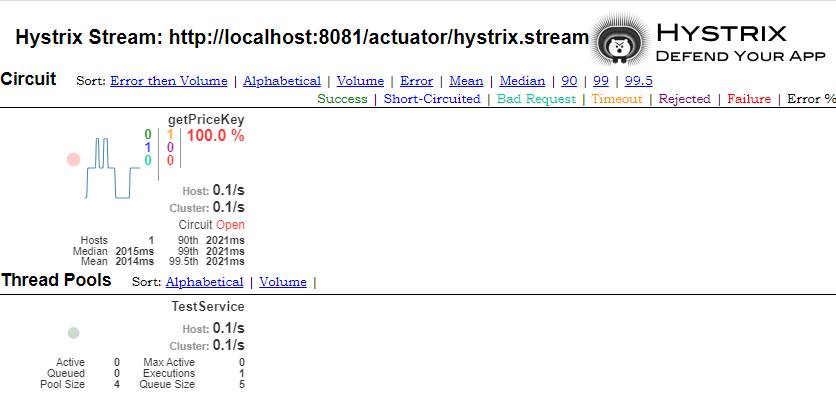
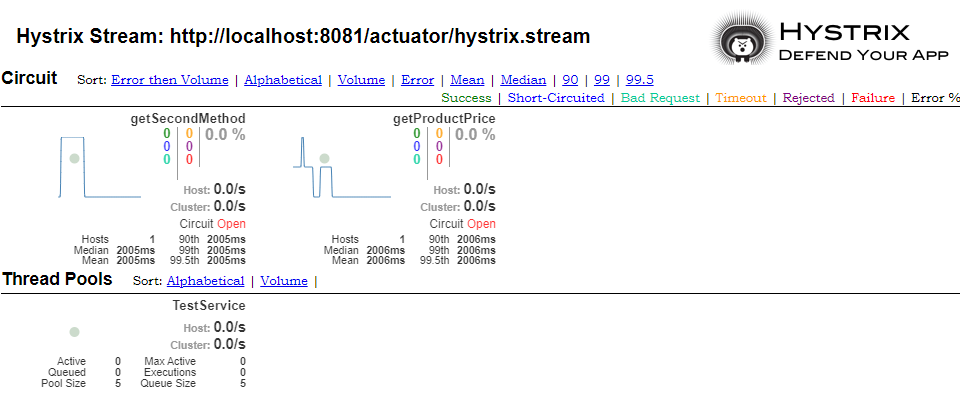
getPriceKey 라고 나오는데 위에서 @HystrixCommand 추가 시 설정한 commandKey 가 나오는 것이다.
만약 commandKey 를 입력하지 않을 경우 method-name 이 그대로 나오며 @HystrixCommand 를 적용한 method 가 여러개라면? 아래와 같이 여러개가 나온다.
'IT > Spring Cloud' 카테고리의 다른 글
| Spring Cloud 시리즈 3 - Resilience4j #2 (0) | 2023.05.25 |
|---|---|
| Spring Cloud 시리즈 3 - Resilience4j #1 (0) | 2023.05.23 |
| Error creating bean with name 'configurationPropertiesBeans' defined in org.springframework.cloud.autoconfigure.... (0) | 2023.05.22 |
| Spring Cloud 시리즈 1 - 개요 (0) | 2023.05.17 |
| Spring Cloud 시리즈 2 - Spring Cloud Config (2) | 2023.05.16 |


